
These days I finally got access to the Pi4 (2GB RAM) that I used for all-sky imagery on my ASI120 MC camera that I now use on my solar scope. It had a bunch of preinstalled Python scripts for all-sky imagery including automatic meteor detection which I will talk about in a future post. Since I also had access to a Starlight Xpress Oculus all-sky camera I decided to give it a go and test it on the Pi4. Little if any information is available online for making these cameras work on the Pi4. The only code I found was this one. The Oculus comes with Windows drivers and simple software to capture images but nothing else. So let’s start.
The Oculus is powered via USB but has a heating system powered by a regular power outlet. This helps prevent dew accumulation inside the acrylic dome. I did find out that the weight of the AC adapter has the tendency of pulling out the plug as it’s located right underneath the camera.
The camera’s USB can be plugged into any of the Pi4’s USB ports. I opted for one of the USB2.0s.
To get the camera feed data into the Pi4 some Python scripts are needed. I started from the ones I found after a bit of searching at this link but discovered that the code has some bugs like uncaught exceptions and it does not work out of the box. Here are the updates I made to it and the reasons for them.
- unzip the downloaded archive into a folder (say sxccd-python-master) and go to the folder using
cd sxccd-python-master/. All commands should be run from this folder. - install pyusb by running
pip install pyusb. The code provided requires it.
- Line 9 in sxccd.py:
self.dev = usb.core.find(manufacturer="Starlight Xpress")does not work (the vendor information was unavailable before the first handshake by the script) so I replaced it with the following in which I specified the vendor and product ID. I also added an exception in the code in case the camera is not found:
# display all USB devices to identify the Oculus/Starlight Xpress
print(usb.core.show_devices(True))
# the vendor and product Ids are taken from the output of the last cmd
self.dev = usb.core.find(idVendor=0x1278, idProduct=0x0509)
if self.dev is None:
        raise ValueError("Starlight Xpress not found")
The first line displays all USB devices and associated information including vendor and product IDs. There are 4 ports on the Pi4 and one is used by the Oculus. To find out which is used by the Oculus I ran the previous commands twice, once with the camera plugged in and then without it to check what has changed.

- Next, I found that running the function model() on line 21 in the same sxccd.py file causes a permission error as I did not have the
/etc/udev/rules.d/99-usbftdi.rulesfile. I had to create one usingsudo cat /etc/udev/rules.d/99-usbftdi.rulesto get admin privileges and added the following line inside the newly created file:SUBSYSTEM=="usb", ATTRS{idVendor}=="1278", MODE="0666". The vendor code was obtained in the previous step. Then I unplugged and plugged back in the camera for the changes to take effect. After running this function in my bundle script (below) I discovered that the model I have is the SuperStarM. - Apparently, the camera I have does not have a firmware version that is available via the called functions, so the firmwareVersion function on line 13 in file sxccd.py throws an exception.
- Another thing I noticed is that since the camera outputs 16-bit pixels they need to be correctly read by the Python scripts. The next code fragment shows how to do this. You’ll have to install OpenCV for Python:
pip install opencv-python
These changes allowed me to run the following script (modified from the example in the link provided earlier) to get the image data (16-bit pixels) from the Oculus. The script can be entered into a file (say oculus_capture.py) via the command line using nano or using the gedit tool from the GUI. It can then be executed with python3 ./oculus_capture.py
import cv2
# to make the next import work download and unzip archive from https://github.com/liponan/sxccd-python and place this script in the folder
import sxccd

camera = sxccd.Camera()

# print out camera model
camera.model()

# retrieve current camera parameters
params = camera.parameters()

# reset camera
camera.reset()

# echo
echo_result = camera.echo("Hello world!")
print( echo_result )

# timed exposure of 1s (1000ms)
# according the the specs the Oculus images are 1392x1040 pixels
image = camera.readPixelsDelayed( exp_ms=1000, width=1392, height=1040, x_bin=1, y_bin=1, x_offset=0, y_offset=0, verbose=True)

# convert the image to 16-bit and normalize colors
img_scaled = cv2.normalize(np.uint16(image), dst=None, alpha=0, beta=65535, norm_type=cv2.NORM_MINMAX)

# display image on screen
cv2.imshow('Oculus allsky', img_scaled)
cv2.waitKey(0)
cv2.destroyAllWindows()

# save image to png file (jpg does no work)
cv2.imwrite("image.png", img_scaled)
And the final output can be seen below:
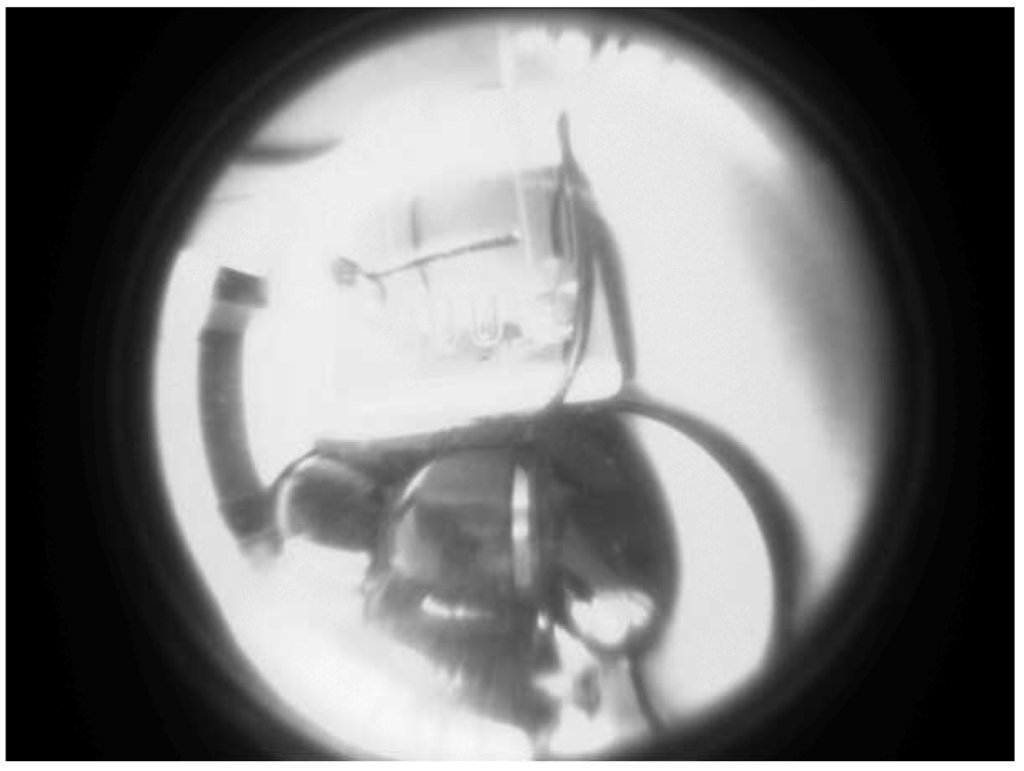
Despite the vendor saying that the camera should be focused, I found that it needs to be refocused by removing the acrylic dome and rotating the lens. I will post a video of this in the near future. Below is an image of the night sky out of focus and showing several dead pixels (white dots)

With these modifications, you should be able to run your Oculus from your Pi4 board. It can be further expanded to upload the image to a web server periodically to show it on your website. More in a future post. Feel free to contact me with questions if you get stuck.
If you enjoyed this post consider following us on Facebook, Youtube, and Twitter or donating on Patreon. Also, stay tuned for public events Marc hosts regularly on Eventbrite.